Do you want to build amazing LEGO builds, that everybody will admire? But do you sometimes think, that it’s too hard and there are a lot of very talented people doing it way better than you? Let me tell you, that talent is not everything. Believe me or not, everybody can become a master builder and nobody knows how to be best at it. They just do what they love and think about it all the time. All it needs is just enthusiasm, practice and patience. LEGO is an amazing medium for making anything you want a reality. But of course, when you are starting out as a designer, there are some useful building techniques that can help you right from the start. This post is all about them and by techniques I don’t mean only which bricks to use and how to combine them. What I want to talk about first are some universal principles, that apply to any form of design or art.
Tip #1: Collect Good Reference
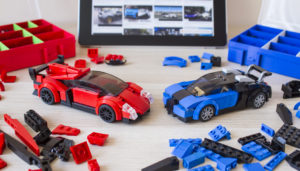
Let’s say you want to build a 1978 Trans Am from Smokey and the Bandit. You think you know how it looks, right? You’ve seen it hundred times on posters, internet photos and maybe even in real life. So you’re pretty sure you know how it looks. But you don’t. Believe me, you just don’t. You have to have it right in front of your eyes. You have to see it from all angles. That’s why every design process should start with collecting good reference photos, videos or models. Just anything that you can get your hands on and that can help. And I can’t emphasize this part enough. Without a good reference, you won’t get anywhere. Maybe you’ll get the look somehow right, but how far are the wheels from each other exactly? What’s the shape of the rear bumper? How does the car look inside? What’s the right scale in relation to a minifig?
I would recommend having some device (cellphone, tablet, pc) always on your table while building and designing. There are some great tools out there ready for you. You can just use Google images search, organize your images into boards on Pinterest or watch some great videos on YouTube. I would recommend a few YouTube channels to start, if you are into cars: Jay Leno’s garage, Petrolicious, and Top Gear.
Tip #2: Engage with Other Builders
You should also do a little research for other LEGO builds of the same car out there. Some people find this discouraging, but I don’t. You don’t have to copy anybody, but you can take a look how they approached the same problems as you did with more or less success. And sometimes it can get you on the right path to find your own solution for the problem. But when you see something you like and want to incorporate into your build always give credit to the designer or even better get in touch with him and discuss it. You’ll be surprised how open and friendly most of the MOC designers are. The MOC scene is a community of creative people like in any other art form. You can learn from the best and take them for your inspiration, but stealing never pays off.
Tip #3: Anything You Learn Can Help You Be A Better Designer
This is probably the shortest advice, but very important. If you want to be good at something, don’t limit yourself to study only that one field. Interesting things you learn in other fields can help you even more! Study photography, art, watch movies and read good books. Get in touch with other people who like to do the same thing – or completely other things. Because everything is connected in life and even things that don’t seem to be related at all.
Tip #4: Nice Clean Silhouette Is Everything
I design mainly minifig scale cars, but this applies to anything, even figures. When you design anything that already exists in real life and people know it very well and have seen it on hundreds of photos, then the first impression is very important. Especially if you plan to post it on Instagram or Flickr, then you have to put everything into one photo. The first thing anybody will recognize is the silhouette. It is because our eyes function like this. We first see the whole shape and when our brain recognizes it our eyes will move around the object to appreciate all the details.
But how can you design a good silhouette? I learned this technique from some painters and sculptors, that I know, and applied it to LEGO building. The first step is to look at the reference and select some main features you want to capture. Then decide which bricks will be best for them and do a very rough build with them just to see the whole shape. The problem is many people just stop here and call it a day. For me, this is just the starting point. Now put your model in front of you and almost close your eyes. This way, you will see only a rough shape of it without any details – yes, the silhouette. Compare it to the reference photo from the same angle and if anything seems not right, change it. But do it roughly just to get the shape and scale right.
It’s very important not to be afraid to change anything or even take it apart and start again from scratch. Because this is the only way you can design something really great. In this stage the silhouette is everything. Do you figure out some amazing small detail you want to keep on your model even if it looks too big or bulky? Forget it. When the overall shape is right then you can start thinking about details and not the other way around.
Tip #5: SNOT, Yes or Not?
SNOT means Studs Not On Top. This is a personal thing, but I think it needs to be addressed here. We usually perceive supercars and cars in general as sleek, clean looking, having nice curves and lines. And in LEGO form, there’s just one thing that can destroy this clean look like nothing else: studs showing everything looking like some awful dents on the hood of your cars. So I always finish my build with a layer of tiles and slopes to get the sleek look. Sure, this is a personal preference and you can design great cars without it, but I strongly encourage you not to do so. Your life as a minifig scale car designer would be much easier. And as a photographer you have a much better object in front of you, catching and reflecting light as a real car would.
Tip #6: Three Layers of Details
We looked at a bunch of references and made a good silhouette. What’s next? As they say, the devil is in the details! Now you have to de-construct the whole build and find spots, where some details should be added to make it more visually appealing to the eye. The tricky part is to find a good balance because this can be easily overdone and your model could start to look like a mess. I tried to find a good advice for this for a long time and finally, I found this lecture by Gleb Alexandrov, 3D graphic artist who’s doing some amazing Blender tutorials on YouTube:
Even if you know nothing about Blender or 3D modeling, watch this video carefully and you will get a great advice. Basically, there should be 3 levels of detail evenly distributed throughout your model: primary big shapes, secondary smaller shapes which divide the main shape and the smallest tertiary details which finishes everything. All of them should be in the right ratio so that the model is not either lacking visual interest or having too much tiny detail that nobody will ever see or appreciate.
Tip #7: Take Away Everything You Can
My single most important motto is: Less is ALWAYS more! This should be carved into stones. I’m a minimalist. What does it mean? When you have the right silhouette and all the important details added in, then it’s time to look at it once more, and start to make the real design decisions – what to keep, and what should go. The rule of thumb is: If I take this part away, would it still look like a 1978 Trans Am? When the answer is yes, then the part is unnecessary. I like to think about it as a sculptor. Michelangelo once said that when he selects a block of stone, he sees the sculpture inside of that block and his job is only to remove all the extra stuff. When you can’t remove anything, then jour job is done. This is one of the best design advice I ever got and it applies to LEGO building very well.
The one big limitation in building minifig scale cars is, you just can’t get every detail right. You CAN’T. So you have to decide which lines and details are the most important and recreate them and let other features on your viewers’ imagination. Like when you are reading a good book. There’s always something left to the reader’s imagination.

Tip #8: The First Impression Is the Most Important Thing
Congratulations! Now we got to the point where our model is finished and we are satisfied with it. And exactly here is the moment, where most of the people do another fatal mistake: they rush to show it to the world. Even the best looking build won’t look nice in a bad photograph. I have seen posts from people all over the internet, where they were saying things like I’m sorry for the bad quality of the photo, the lighting was bad, I shot it on my phone in a hurry… and this list of excuses goes on and on and on. When you spent several hours or days designing something great, why can’t you spend some more time to take a better photo or wait for the better lighting? Instagram or Flickr is all about good photography, so if you want to present your work in the best light, you will have to spend some time learning how to photograph it. I plan to do a tutorial on LEGO photography as well.
I hope these tips are helpful for you as much as they are helping me design things with LEGO every day. And if you have some tips and tricks of your own I would love to read about them in the comments! Enjoy building!
If you like what I’m doing and want to support me, you can buy me a “coffee” at ko-fi.com ;o)